Thinking inside the Box:
A complete EQ and Compression tutorial
Part Six: EQ: Practical Applications 3: Mixing and making it fit
Our array of splodges
Cast your mind back to our vision of a track as an array of different coloured splodges on our graph. Let us imagine a beginner producing struggling to achieve a decent mixdown on a tune. I'm sure we've all been there - I know I suffer this problem regularly. A sound is far too quiet, you can hardly hear it... So you turn it up... and five minutes later, it is far too loud and you can hardly here something else! You keep tweaking, but somehow or other, you can never get the mix you want - which is for each sound to be quite clearly audible simultaneously. Instead, the elements just fight each other, refusing to gel together. For the sake of clarity, let us forget about all elements of the track except the three which are giving our hypothetical producer a headache: a pad (blue) and two synth parts (grey and yellow. And yes, that's how I spell grey, thank you very much!). This is how they currently look:
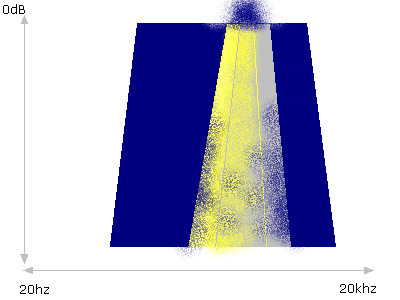
When depicted visually like this, it becomes quite clear what the problem is. The three elements are all fighting for domination of a single small area in the frequency spectrum. By doing so, none of them is clearly audible, with the added disaster of a large amplitude peak being created (wasting headroom). Although, as I have said, a degree of overlap is entirely normal, ultimately there is not room for all three to occupy the same spot like this.
What can we do about it? Well, the first obvious step is to separate the two synths. They need to be next to each other, not on top of each other. Since the yellow one is already somewhat lower than the grey one, it makes sense to attempt to pull the yellow one left a bit, and push the grey one right a bit. To achieve this we may allow more low-frequencies through on the yellow one (by lowering a hi-pass filter cutoff, or reducing any low-cut EQ we have, for example), whilst sculpting away some frequencies from the yellow synths upper end (with our subtractive EQ, as on the previous page). For the grey synth, we do the reverse: roll off more of its low-end, whilst allowing more upper frequencies to come through (if applicable). In addition, we can reduce the strength of the pad in the frequencies occupied by both the synths, with an EQ notch or two. The pad will still be full strength around them, so we wont notice a significant change in its timbre - at any rate, it is a background element, so we can afford to twist it around a bit in order to fit the mix rather more than we could if it were a lead element.
Having made these changes, lets look at our visualisation of splodges.
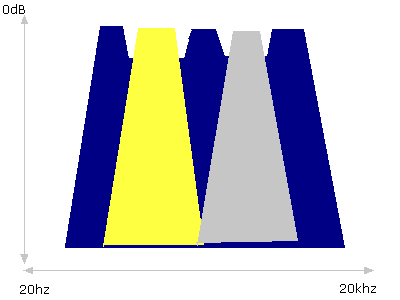
As you can see, everything now fits perfectly. The bad news is that this scenario is entirely fictional. Unless you are an incredibly talented and experienced engineer with a wide range of awesome EQ tools at your disposal, your chances of using EQ shaping to take a track where three sounds are seriously clashing in frequencies, and magically making it all lovely, are in practice very slim. But whilst this example was deliberately exaggerated, and EQ alone wont fix a royally fucked-up track, EQ certainly can help to improves matters when used in this way.
Thinking EQ, not using it
Fortunately there are many other options available to us, options which once again lead me to remind you of the overall importance of this article... That is, not that you should become a ninja EQ master who wields ninja EQ and compression skills at every stage of the game - but rather that you should simply think in these terms, and by doing so, perhaps save yourself from even needing them at all...The problem encountered above, of the two clashing synth parts, is something that we often run across in my live drumnbass band keiretsu. With 10 musicians on stage, we must be very aware of ourselves, to avoid our tracks becoming so cluttered that important parts are masked by other, clashing, parts. Obviously we do not have the luxury of being able to tweak a graphic eq over each and every sound we produce on stage! Therefore we instead use a variety of 'musical' means of fixing these EQ clashes. Some of the most important include:
- Change the octave of one part. Take one of the two clashing parts and simply drop or raise it by an octave.
- Change the instrument of one part. If a violin clashes with an ebow guitar, perhaps a tenor sax will not? Clashing is a matter of timbre - the guitar and violin are both stringed instruments, both legato, both in a similar register. A sax has a totally different timbre, and a tenor instrument would likely also be in a different register. In dnb production terms, this might equate to flipping patches, loading up a different preset or softsynth to play one riff.
- Restructure the song so the two parts do not happen simultaneously. Various further options become available here. You might have one riff play for a 16-bar phrase, before stopping and letting the 'focus' be taken by the other riff. You might alternate between riffs quickly, every bar or so, perhaps even breaking the riffs up, to form a question-and-answer motif (Isotone did this to some of my synths in our track "Aircell", for example). Or you might even put them in totally different parts of the track - one synth line after the first drop, a different one after the second drop, or whatever.
If these and EQ still leave your mix unsatisfactory, there are a few other technical routes to try and help with clashing sounds:
- Reverb, to push one sound further "backwards"
- Panning - put one left, one right, or one central+fixed, one wide+autopanning, or whatever.
- Turn one of them down - simple as (but not, really, honestly, a fix.)
Subtractive EQ: Cut Not Boost
You may have noticed we have only been talking about subtractive EQ (that is, sculpting away portions of sound), and not additive EQ. I'm sure you are all already aware that pretty much every EQ under the sun allows you to boost as well as cut, so why have I not discussed that? Because, as a general principle, it is better to cut than boost. I shall explain why with another of my legendarily tortuous metaphors. Remember how subtractive EQ was like scraping clay away from your physical splodge of sound? Well therefore additive clay is like taking a blob of clay from your stash and wacking it onto your 'sculpture'. Follow this metaphor through and you begin to see why it is a bad idea. A clay sculpture of, say, a person's head, which was made from a cast of their head, will in theory be an exact (or pretty damn close) version of their head. If you take a load of extra clay, and try and add it bit by bit into the head, to try and end up with the same head, only twice as large overall... how well would you do? Not very well. Before very long you'd be lucky if the head even looked like a head, let alone recognisably like the person it was cast from. So it is with EQ - when adding, the effect unit has to effectively create 'new' signal where there was none originally, and this degrades the quality of the signal. Its the same reason you can cut a piece of paper smaller but you can't cut it larger. Sort of.Did that make any sense? I hope so... Anyway... of course, this isnt to say additive EQ is wrong. Especially not in drumnbass where there are no rules! You could use extreme additive EQ as a heavy sound-munging tool, for example. It also comes in handy, where, for example, your snare has the snap you want, just not quite enough of it. A nice 2db boost at the sweet spot is a lot easier than adding a whole new layer.
Where additive EQ is definitely discouraged is in situations where subtractive EQ provides an equally worthy alternative. For example, if you have two overlapping sounds, and you want sound A to be more dominant than sound B, you could boost those parts of sound A being obscured by part B. Far better, though, to cut those parts of sound B which are obscuring A. Aside from my bizarre metaphorical explanation above, there is one simple reason why this better: headroom, again. Yes, any time you make something louder with your EQ, thats eating into your total headroom, which will ultimately only serve to make your finished track all the quieter. If you can achieve the same result (A dominates B) by removing something from B, then you are not eating up any more headroom, rather you are keeping it available.
Where boosting helps
Here's a tip from keiretsu's live engineer, Henry.- "How do you get the drumkit to sound good?"
- "Well, I make it sound as bad as I possibly can, then I do the opposite".
On first read, its funny, but on closer inspection, it is extremely sound advice. You see, the human ear is a helluva lot better than hearing things which are there than it is at hearing things which are not there. Drumkit toms, being as they are (a) tuned and (b) beaten hard with a mic millimetres from the surface, are notorious for resonating and causing ringing and feedback. Part of the solution is a sharp EQ notch at the resonant frequency - however, when placing a cut on the EQ and then scrolling the frequency, it is sometimes hard to pick out exactly where you need to be. What is a lot easier is adding a huge boost, and then sweeping the frequency. Sooner or later, all hell will break loose, the drumkit will sound utterly atrocious, the mics will be feeding back like there is no tomorrow - and you know you've hit it. Just flip the boost to a cut and you're sorted.
The same technique can be very helpful when producing. If there is something "annoying" about a sound, it is usually quite hard to work out exactly what annoys you about it, let alone what frequency band this annoyance is emanating from. However, if you add a huge EQ boost, then scroll the frequency, you will often stumble on something very annoying indeed. Its kinda like zooming in on a picture to better spot flaws in the details, I suppose.
This is as much as I shall cover on EQ for now. First, it is time to cover the basics of compression, and having done so, we will be in a position to start putting the two together, with a brief look at the powers of multiband compression.
<< Part Five: EQ: Practical Applications 2
Part Seven: Compression: 1 (to be continued...) >>